Thursday, October 22, 2009

A Busy Baby and Falling Leaves

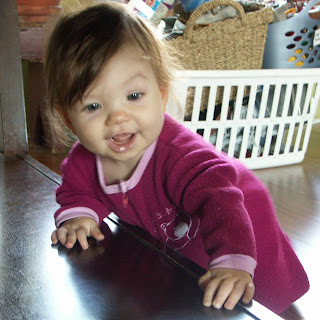
Super Baby crawling on the furniture at 7 months!

Last Saturday we went out and raked the leaves up under one of the maple trees, then we walked up the road to see the neighbors sheep.


Sunday, September 20, 2009

I haven't blogged in months, there's too much to catch up on; life is busy!!! I'll update with a few pictures....


A growing baby~ Rowan is 6.5 months now and she's an insanely busy baby, I can't even imagine how get a single thing done once she's crawling!

Chickens~ We got 5 chicks at the beginning of September, they'll bring us plenty of eggs in a few more months. This picture was of the little cuties the day we got them, now they're about 4 weeks old and they look more like some strange type of prehistoric dinosaurs...not cute anymore! Back to school & back to work. I did some sewing over the summer but now I'm getting back into some custom work. This was a fun order-

Monday, June 15, 2009

A must read blog and moving news

A few weeks ago I got an email from Andrea at Glimpse Reviews. A group of Mamas who review mom, baby, and kidlet products. The majority of products reviewed by these mamas are made in Canada by Canadians!! She wrote up a great review for County Cloth products, have a peek and be sure to enter the give away contest for some County Cloth goodies :)

http://www.glimpse-reviews.blogspot.com/

WE'RE MOVING! We'll be moving our family on June 27th, we've been busy cleaning and fixing up our new home and with barely two weeks till moving day we're on a tight schedule. I'll continue to have open shops and be mailing until June 25th (or sooner if I sell out of stock).

After June 27 I'll be offline for most of July (yes, offline with no internet access!! Ahhhhh) so I won't be able to reply to emails with any speed at all but will do so as I'm able. I'll aim to start restocking my Etsy shop in July and I'll start stocking at Escape again on August 5th http://hyenacart.com/Escape/ Be sure to check into Escape on August 5th when we'll be doing a special Zoo themed stocking.

Wednesday, May 6, 2009

laundry, nurse, laundry, nurse.....

this feels like what I do all day long! Each day brings a minimum of two loads of laundry, we try to be conscious of how much laundry we produce but with two play loving boys, baby spit up and dirty diapers it never ends. And now that the spring weather is here I use the line as much as possible so that takes a little longer and I only wish I had a super capacity machine!!


Our littlest nursling is thriving and growing so quickly. She's a restless little nurser though so I can't even multi-task by doing computer work while she's feeding. I made a ring sling a few weeks back, initially I didn't think Rowan enjoyed it since she'd start fussing when I put her in. Now that I've figured out how she likes to be carried in the sling it's been a lifesaver and I see myself developing an obsession with making more slings for us. I've also gotten a lot of use out of the wrap carrier I made but when she's fussy the ring sling is much easier to pop her into quickly.


Regardless of all my nursing and laundry I've been able to continue to sew (for others anyway!) and keep my Etsy shop with some stock in it. Also, I haven't announced to my own customers that I've joined a new congo on Hyena Cart named 'Escape'.


For those of you who aren't familiar with Hyena Cart a congo is where a group of WAHM's join together to sell their specialty items. We've got a very talented group of Mama's and I was honoured when they asked me to join them. We'll be stocking every third Wednesday morning at 11 o'clock and you can always be sure to find new items.

http://hyenacart.com/Escape/ have a peek, we stocked today!


I've been taking custom orders and I've been a little slower in getting them done but most orders have been going out within two weeks. I will be closing for custom orders as of today. We just bought a house and we have a quick closing date.

It's a wonderful house that carries the label 'handyman's special'. Yup, this house needs a little love and attention before we move in. I should be ready to take orders towards the end of July (providing our Internet gets hooked up alright in the boonies!) I'll be spending May & June packing and focusing on getting our new home comfortable for the kids in July. I will continue to stock at Etsy and at Escape on HC during May & June though so be sure to check in!


look who was outside my office window this morning...

Wednesday, March 11, 2009

Babymooning!

Our daughter was born Tuesday March 3rd! We had a long and uncertain labour that resulted in a wonderful birth experience. Born naturally and delivered by our wonderful team of midwives. Here she is! Weighing in at 7lbs 7oz and 20" long.


I'll be taking some time off from custom orders but I hope to start adding some more stock to my shops towards the end of March. Thanks for all your kind wishes and support!

Wednesday, February 25, 2009

Ready to diaper....

I think we're ready to diaper our new baby! I knew I wanted to cloth diaper my son but he arrived early and he was 3 months old before I got him out-fitted with a cloth diaper stash. This baby is ready to go from the start!!

I decided to keep it pretty simple for the newborn and size small stash since they grow out of these sizes so quickly. Here's most of what we have for the early sizes.

A new set of washable cloth wipes, each with one side in velour the other side in flannel.


Fitted newborn diapers. I made the first two in the top row from some pretty bamboo, I did the rest of them using flannel since I had it on hand.


Newborn PUL covers xs Thirsties, 2x Proraps, 2 x Bummis Super Whisper Wraps


A few all in one diapers. All in one diapers aren't my favorite type of diaper but I thought it would handy to have a few. I used Zorb in the cores of these so hopefully they'll dry fast.


More newborn diapers that were made by other work at home moms....I hope I have the names right! Top row: 2 x Lullaby Diapers, BV pocket fitted by Mandie's Menagerie (love this diaper!!) 2 x Primm n' Proper size 1 fitteds, 1 x Kissaluvs NB


Wool covers! The little pink bloomers from Luxe Baby and they are so soft & pretty! The other wool cover is a size small and will be nice to have for the warmer months.


I knit these little wool longies before finding out that we're expecting a girl. I figure they're still perfect for her though. I also knit the little sleep sack, I debated how much use we would get out of one but now I'm almost wishing I'd knit 2 of them.

I love prefolds when I diapered my son, they're so simple (and cheap!!) I was able to find these locally for $1.50 each (cdn) they're the unbleached infant size. I dyed six of them (wish I'd had some more colour variations) and the other six I did some appliques on. The best thing about these prefolds is once the baby out grows them we can still use them as inserts for pocket diapers. There's also one preemie size embelleshed prefold that I bought from Snowflakes on Hyenacart.

Tuesday, January 20, 2009

Do-It-Yourself Postpartum Pad Tutorial


The cost of investing in postpartum cloth can be overwhelming especially with all the other expenses of maternity clothes and baby gear.

I created this tutorial with a few things in mind....I wanted it to be possible to create super affordable pads (even if you don't have a sewing machine) and wanted to create a pattern that could incorporate recycled fabrics. You can also buy the fabric and notions you'll need at a fabric shop.

This pad uses microfleece as the backing with a core and top layer of flannel. The flannel edges are finished using a simple scissor snipping technique just like a rag quilt.


This is the first tutorial I've done so please feel free to leave questions and comments, I'll try to respond to them quickly but I'm expecting a baby myself so I may be hmmm delayed!!


What you'll need

Paper
to draw the pattern out on

Flannel
re-use some old sheets or receiving blankets; just be sure the flannel isn't thread bare....you want it to be absorbent. New flannel is pretty inexpensive and there's lots of fun prints to choose from

Micro fleece
re-use a blanket, pj pants, or purchase some at a fabric shop


Notions
Scissors, thread, pins, Velcro or snaps


First off is the pattern, I don't know how to make a pdf pattern so I've included some pictures with the measurements for you to trace out, I used a piece of legal size paper to draw my pattern on but newsprint or tissue paper also works well.


You can see the measurements on these drawings. The first picture is of the piece you'll use to cut the micro fleece bottom. If your paper is folded in half the wing measurement will be 4.25" out from the centre. The second picture is the pattern you'll use to cut the core from using flannel.

To sketch these measurements out try folding your paper in half so that the sides are symmetrical.


Once you have your pattern pieces cut and ready you can start cutting your fabrics. For each pad you'll need to cut 1 micro fleece bottom piece and 7 layers of flannel cut for the core.


Set your microfleece bottom aside, you'll be working on the core next. Pin your layers of flannel together and get ready to sew them. You can sew them by hand, or with a sewing machine, leave a 1/4" edge with the right side of the fabric facing out. Just a simple straight stitch.
The nice part about this pattern is that there's no turning & top stitiching so it saves you some sewing work....especially nice if you're sewing them by hand or if your sewing machine is a clunker that hates too many layers!! I used the same technique to diaper doublers for my sons diapers, I had an old singer that was great but didn't like many layers.

I've used my sewing machine to stitch the core together. (sorry for the dark picture)


Once you have your core layers sewn together you're ready to do some snipping. A sharp pair of sewing scissors will make this job easier. Snip into the outer edge of the pad (just be careful not to snip through your stitches!) snip at about 1/4" intervals all the way around the pad.


This is the same technique used to make the popular rag quilts. Once you've washed your pads a few times the raw flannel edges will fluff up.

Now you'll need the microfleece base. Centre your core on the microfleece and pin it securely. Next, attach the core to the microfleece by sewing a straight stitch about 1/4" from your first row of stitching.


Once the core layers area attached to the microfleece base you're almost finished. You'll just need to attach fastener to the wings. I've used poly-resin snaps and a snap press. If you don't have access to a snap press velcro would work well or some snaps that you can sew on (available at a fabric shop). If you're stuck a plain old safety pin would work too :)


Semi-Custom Sale Ending...

I'll be finishing up the semi-custom sale on January 22, it was lots of fun and I hope those who ordered enjoyed their pads. I enjoy working on a semi-custom order basis so I'll certainly be offering something similar in the future. Here's some pictures of orders that went out during the promotion. There's still a couple more days to get your order in before I remove the listings from my hyena cart shop.

www.hyenacart.com/countyclothcreations